For compliance and budgeting purposes, organizations will periodically audit, or take a physical inventory, of their assets to increase visibility of lost items. During this time, users can capture other important information such as location, condition, specialized statuses etc. RedBeam will generate inventory reporting based on real-time findings.
RedBeam offers the ability to open multiple audit sessions at a time with the option to restrict the sessions to specified locations. This allows users the flexibility to open two sessions for two separate buildings, multiple sessions for different rooms, one session for all locations etc. Inventory sessions can include the same locations as other sessions opened at the same time.
Once an inventory session is closed, users will not be able to continue taking inventory, but the history of that session will be saved in RedBeam.
Manage
To open an inventory, navigate to the Manage tab. Click the ![]() button and enter an Inventory Name. Use the Company, Building and Room inclusion or exclusion criteria to assign locations to the inventory session if desired. Click Save to open the inventory.
button and enter an Inventory Name. Use the Company, Building and Room inclusion or exclusion criteria to assign locations to the inventory session if desired. Click Save to open the inventory.

The newly created inventory information will then display in the Manage grid.
To view all inventory details, click on the inventory in the grid. Inventory details will display in the pane on the right of the screen.

Details include:
- Inventory Name – This is the inventory name entered during the import process.
- Total # Assets – This is the number of active assets in the inventory.
- # Unfound Assets – This is the number of unfound assets in the inventory.
- % Found – This is the percentage of found assets in the inventory.
- % Unfound Items - This is the percentage of unfound assets in the inventory.
- Date Created – This is the date and time when the inventory was created.
- Created By - This is the user who created the inventory.
- Status – This indicates whether the inventory is Active or Closed.
To close the inventory, change the Status from Active to Closed and click the Save button. Once an inventory is closed it cannot be reopened, so only do this after having completed an inventory.
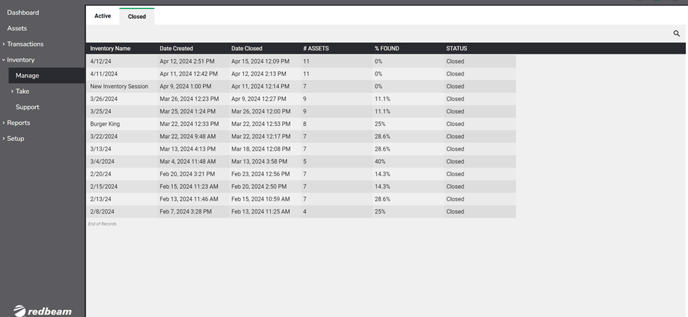
Click the Closed tab to view the details of all closed inventories.
To information on viewing inventory reports, go to the Reports section of this document.