The Update function is used to create, edit, view, or delete assets.
To create an asset, scan or enter a new Asset ID. To edit an existing asset, scan or enter an existing Asset ID. If using a mobile device with a camera, the camera can also scan a barcode by clicking on the ![]() icon.
icon.

The system will conveniently suggest an Asset ID that is one number higher than the current highest Asset ID already in the system. This can be overwritten. The only required field to create an asset is the Asset ID field.
When done entering asset information, click the Save button to create the asset.
A copy of an existing asset’s information can be made by clicking the Copy button.
To delete an asset, click the Delete button. A warning message will display prior to deletion.
To edit an existing asset, click the asset record in the grid. Assets in the grid can be searched using the ![]() icon.
icon.
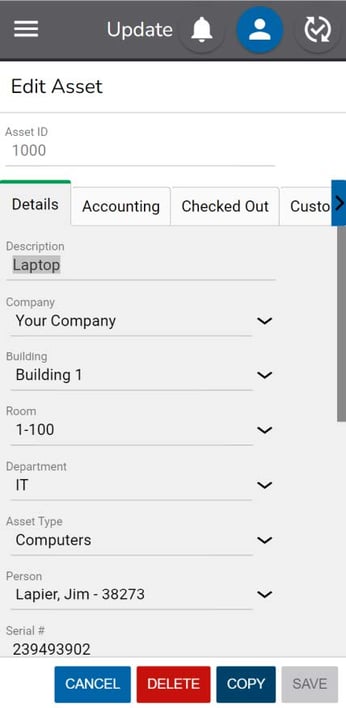
Details
Enter asset information under the Details tab including:
- Asset ID – This is the number used to uniquely identify the asset. For barcode scanning to work properly, this complete number (including any leading zeros) should be encoded in printed barcodes used to tag the assets.
- Description – This is a description of the asset.
- Company – This is company to which the asset is assigned.
- Building – This is the building in which the asset is located.
- Room – This is the room in which the asset is located. Selecting a room is required when taking an inventory.
- Department – This is department to which the asset belongs.
- Asset Type – This is the asset category that generally describes the asset.
- Person – This is person to whom the asset is assigned.
- Serial # – This is the serial number of the asset. If an asset barcode is damaged or not visible, the user can scan or enter the serial number while updating or taking an inventory of the asset.
- Status – This is status of the asset.
- Manufacturer – This is manufacturer of the asset.
- Model – This is the model number of the asset.
- Condition – This is the condition of the asset.
- Notes – This is a free text field for additional information about the asset.
- Active – This is a Yes/No field. Assets marked as inactive, will not show in an Inventory or in Check In or Check Out transactions.
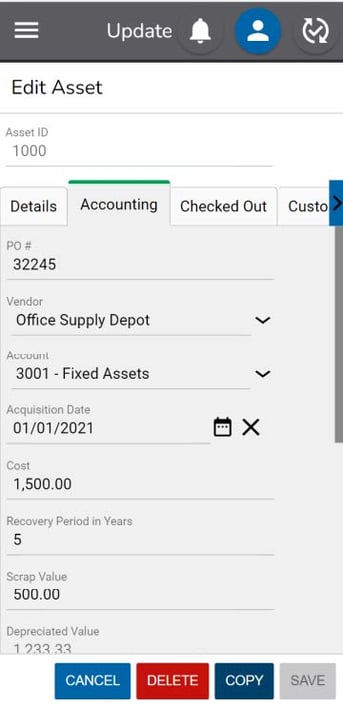
Accounting
Enter asset information under the Accounting tab including:
- PO # – This is the number of the purchase order on which the asset was purchased.
- Vendor – This is the vendor from whom the asset what purchased.
- Account – This is the financial reference account under which the asset was purchased.
- Acquisition Date – This is the date on which the asset was purchased.
- Cost – This is the price paid for the asset.
- Recovery Period in Years – This is the period during which an asset is depreciated.
- Scrap Value – This is the value an asset can be sold for once it is fully depreciated.
- Depreciated Value – This is a calculated value that represents the cost minus the scrap value minus the amount deprecated.
- Amount Depreciated – This is a calculated value that represents the amount of the asset’s value that has been depreciated. One month of the asset’s value is depreciated at the end of the first full month since the asset was acquired and subsequently at the end of each month after that until the asset is fully depreciated. The scrap value is subtracted from the cost prior to calculating depreciation.
- Warranty # – This the number associated with the asset’s warranty.
- Warranty Start Date – This the date that the asset’s warranty begins.
- Warranty End Date – This the date that the asset’s warranty ends.
- Lease # – This the number associated with the asset’s lease.
- Lease Start Date – This the date that the asset’s lease begins.
- Lease End Date – This the date that the asset’s lease ends.
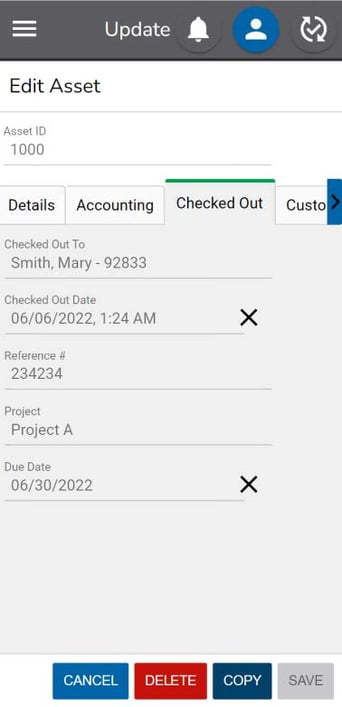
Checked Out
The Checked Out tab shows information about the asset if it is actively checked out. Check out information includes:
- Checked Out To – This is the Person the asset is checked out to.
- Checked Out Date – This is the data and time the asset was checked out.
- Reference # - This is the Reference # entered in the Check Out transaction.
- Project – This is the Project entered in the Check Out transaction.
- Due Date - This is the Due Date entered in the Check Out transaction.
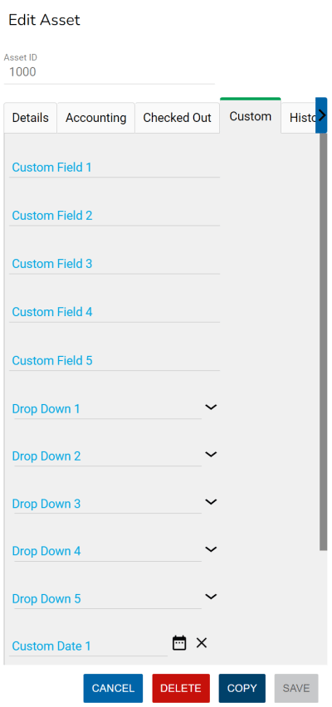
Custom
The Custom tab provides additional open text, drop down, date and toggle fields if desired.
History
A full history of changes to an asset are displayed in the History tab.